Digital Post-Processing - Part 2 : Noise Reduction

In Part 1 of our Digital Post-Processing series, ButterflyCircle member Loh Mei Yee shared with us the basics of post-process editing by adding contrast, brightening, sharpening and cropping a shot. Mei Yee is back again in Part 2, where she takes us through a simple process of reducing 'noise' in a photo using a Photoshop Plug-in. Over to Mei Yee...

In my earlier article, I showed how you can enhance your photo with the use of Nik plug-ins – ‘Sharpener Pro’ and ‘Viveza 2’. In this continuing article of the series, I will touch on an issue that many of us often face – NOISE! Not the disturbing noise from annoying neighbours blasting loud music but digital noise in photography. I will be demonstrating how to reduce noise in photos using another Nik plug-in called ‘Dfine 2’.

What is noise? In digital photography, ‘noise’ is the commonly-used term to define aberrant pixels, or simply known as the “small dots” that are all over the image which causes a rough look or texture, making the photo unpleasant to look at. These small dots might not be very noticeable but they can be quite visible when you zoom in and view the image, or when your image is heavily cropped.
What causes digital noise? Higher ISOs which you may need when shooting in low light, is the main culprit in causing more noise. Another reason is the size of the sensor of your camera. If you compared a DSLR and a point and shoot camera (PnS), and both have 10 megapixel sensors, the DSLR would yield a much cleaner image with a lot less noise when compared to the point and shoot image. This is because DSLRs have much bigger sensors and therefore can accommodate larger *photosites compared to point and shoot.
*A photosite (photo/photon sensing site), as it is often termed around the web, refers to a sensor pixel in this context. Depending on the design of the sensor, a photosite or pixel may contain the necessary circuitry for a single coloured pixel, or it may contain the necessary circuitry for multiple colours of pixels
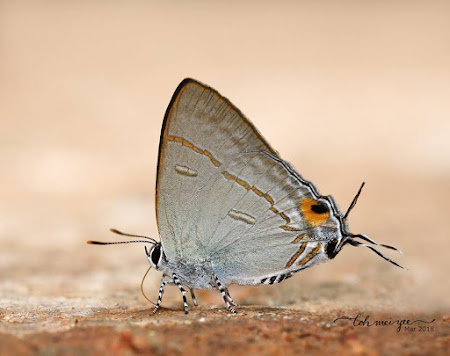
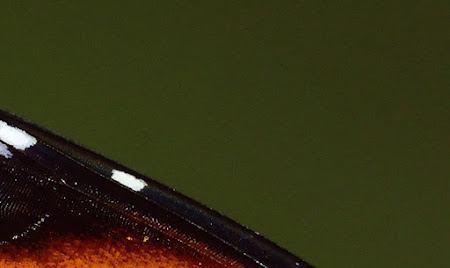
Take a look at the image below, you’ll notice that noise is more obvious on areas that are flat mid-tones (which is normally on the background) and less noticeable on areas that are bright and are with textures. What we want to do is to reduce the noise on the background.
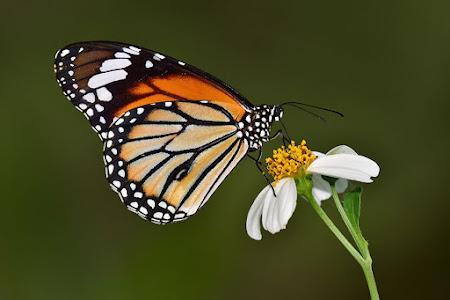
In this tutorial, I have chosen a photo of the Common Tiger that I shot some time in September 2017. I will be using ‘Dfine 2’ to reduce noise mainly on the background whilst no noise reduction will be done on the butterfly. We want a smooth looking background but retain the details on the butterfly.
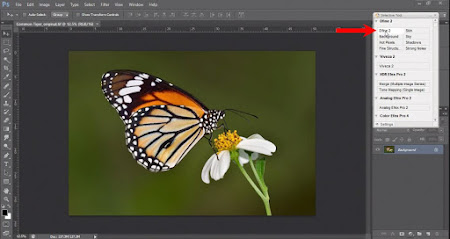
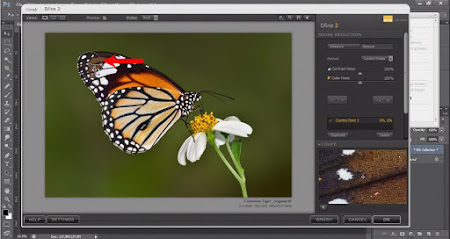
Once you are in Photoshop, go to your Nik Collection Plug-ins menu and launch DFine2

Dfine 2 will analyse the image and reduce the noise accordingly.
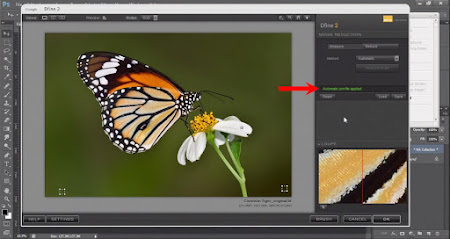
Automatic profile applied. Noise reduction has been applied to the entire image.
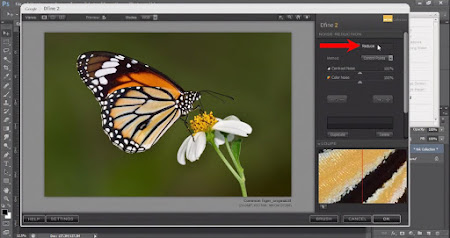
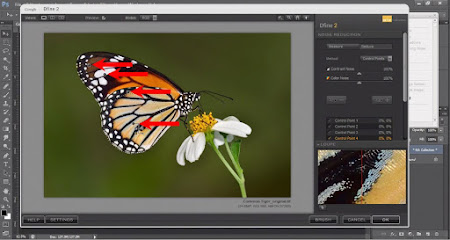
To further reduce the noise, click on the ‘Reduce’ button.
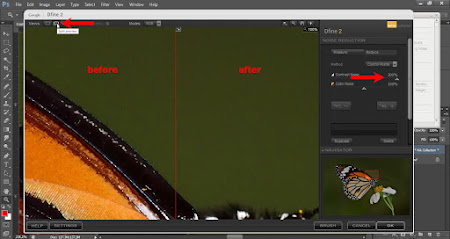
Increase the ‘Control Noise’ to 200%. Double click on the image to enlarge, click on ‘Split preview’ to have a look at the before and after effect. When you move the red line to the left and right, you’ll notice a significant difference in the green background.
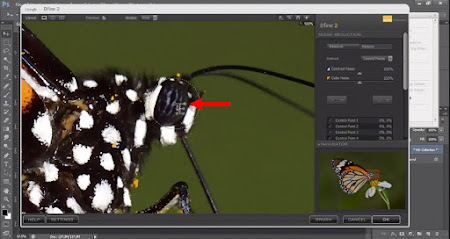
Because noise reduction has been applied to the entire image, it means that some details on the butterfly have been lost. The next step is to bring back the details on the butterfly.
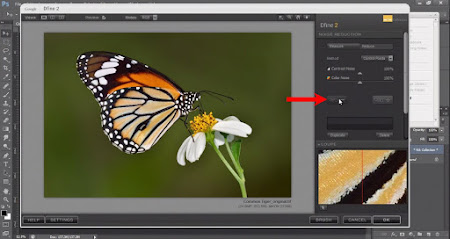
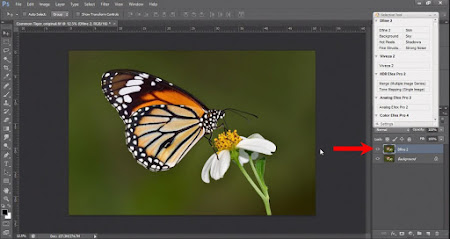
I am using this button (see red arrow) to add control points on the butterfly. This is to remove the noise reduction effect and bring back the details.
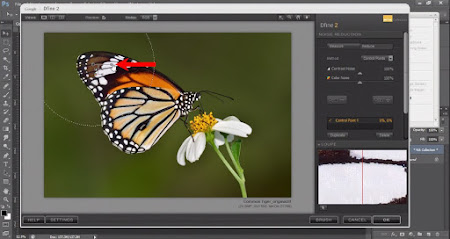
Start with adding a control point at the tip of the forewing (or anywhere you prefer), move the slider to the left, to cover only the area of the wing and not to affect the background.
Continue adding more control points where needed.
Continue adding more control points where needed.
Double click to enlarge the image when adding control points on small areas. Double click again to reduce the image.
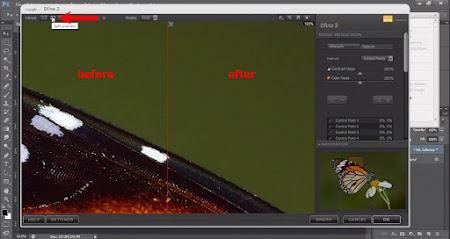
When you have finished adding control points, you can click on ‘Split preview’ to have a look at the before and after effect. Move the red line left and right, you’ll notice a significant difference in the green background but little to no changes on the butterfly.
Click OK and a new layer is created. The original image is at the Background layer.
Original photo with noise

Photo after applying Dfine 2 noise reduction
Original shot without post-processing
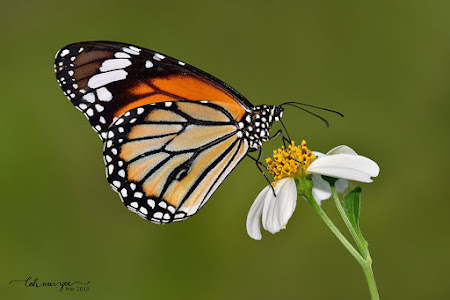
Final shot using post-processing techniques discussed in Parts 1 and 2 of this series
This brings us to the end of Part 2 tutorial. To further enhance your photo from here, you can also apply the steps that are shown in the Part 1 article. I have made a video tutorial of how I edited my photo using Dfine 2. See you again soon in the next article in my digital post-processing series!
Noise reduction using DFine 2
Remember to watch the video in HD for better quality
Text and Photos by Loh Mei Yee

What causes digital noise? Higher ISOs which you may need when shooting in low light, is the main culprit in causing more noise. Another reason is the size of the sensor of your camera. If you compared a DSLR and a point and shoot camera (PnS), and both have 10 megapixel sensors, the DSLR would yield a much cleaner image with a lot less noise when compared to the point and shoot image. This is because DSLRs have much bigger sensors and therefore can accommodate larger *photosites compared to point and shoot.
*A photosite (photo/photon sensing site), as it is often termed around the web, refers to a sensor pixel in this context. Depending on the design of the sensor, a photosite or pixel may contain the necessary circuitry for a single coloured pixel, or it may contain the necessary circuitry for multiple colours of pixels
Take a look at the image below, you’ll notice that noise is more obvious on areas that are flat mid-tones (which is normally on the background) and less noticeable on areas that are bright and are with textures. What we want to do is to reduce the noise on the background.

In this tutorial, I have chosen a photo of the Common Tiger that I shot some time in September 2017. I will be using ‘Dfine 2’ to reduce noise mainly on the background whilst no noise reduction will be done on the butterfly. We want a smooth looking background but retain the details on the butterfly.

Once you are in Photoshop, go to your Nik Collection Plug-ins menu and launch DFine2

Dfine 2 will analyse the image and reduce the noise accordingly.

Automatic profile applied. Noise reduction has been applied to the entire image.

To further reduce the noise, click on the ‘Reduce’ button.

Increase the ‘Control Noise’ to 200%. Double click on the image to enlarge, click on ‘Split preview’ to have a look at the before and after effect. When you move the red line to the left and right, you’ll notice a significant difference in the green background.
Because noise reduction has been applied to the entire image, it means that some details on the butterfly have been lost. The next step is to bring back the details on the butterfly.

I am using this button (see red arrow) to add control points on the butterfly. This is to remove the noise reduction effect and bring back the details.

Start with adding a control point at the tip of the forewing (or anywhere you prefer), move the slider to the left, to cover only the area of the wing and not to affect the background.

Continue adding more control points where needed.

Continue adding more control points where needed.

Double click to enlarge the image when adding control points on small areas. Double click again to reduce the image.

When you have finished adding control points, you can click on ‘Split preview’ to have a look at the before and after effect. Move the red line left and right, you’ll notice a significant difference in the green background but little to no changes on the butterfly.

Click OK and a new layer is created. The original image is at the Background layer.

Original photo with noise

Photo after applying Dfine 2 noise reduction

Original shot without post-processing

Final shot using post-processing techniques discussed in Parts 1 and 2 of this series
This brings us to the end of Part 2 tutorial. To further enhance your photo from here, you can also apply the steps that are shown in the Part 1 article. I have made a video tutorial of how I edited my photo using Dfine 2. See you again soon in the next article in my digital post-processing series!
Noise reduction using DFine 2
Remember to watch the video in HD for better quality
Text and Photos by Loh Mei Yee
Previous articles in this series :
Digital Post-Processing - Part 1 : Basic Post Processing